I was trying to beef up my Tesla Coil driver and there were a few challenges:
I have built my driver, which I may update depending on my tests, but with what I have I learned a good deal to know where my shortcomings are, which I summarize here.
The coil is basically a transformer nothing too special by today’s standards. The output voltage to input voltage ratio is equal to secondary winding to primary winding number of turns. Some general properties of a Tesla coil are as follows:
- The primary is made of thick wires wound around 10 times, because much higher current at very high frequencies (1MHz) run through it. Skin effect increases the resistance of wires.
- The primary diameter is usually bigger than secondary, or grows as it goes up. One of the reasons is that the secondary voltage is higher at higher heights of the tower and more clearance to it is needed to ensure the energy doesn’t discharge to primary halfway, unless the primary has good insulation around it.
- The secondary is made of much thinner wire as way more windings is needed, usually 1000 turns or more.
- The winding on secondary only goes one way, and not back and forth. Because as we get close to the end of the winding the voltage significantly rises in terms of 100s of kilo volts. So if the windings go back and forth, low and high voltage sections of secondary will be overlapping, breaking the insulation and arcing between the turns.
As you see for my first secondary winding I used 28AWG wire and above 700 turns. It was wound on a black PVC pipe with about 4.2cm diameter and 27cm long.
The top load toroid size was pretty much randomly picked. I decided to make it like a spring. It ended up being around 5cm inner diameter and 11cm outer diameter (3cm toroid diameter) made out of 12AWG tin-plated copper wire. I placed it on a cross made of the same wire and used a threaded metal rod to hold it with some nuts. As you can see I passed the metal rod through a round piece of plywood and fastened the rod and wood with more nuts. The rod is cut close to the wood and doesn’t go through the coil to the bottom, because it will have a very large voltage that would arc to lower voltage sections of the secondary. The output of the secondary is tied to the rod and toroid.
I was able to wind with the help of my drill. The wire was thick enough not to break under the tension applied, but I couldn’t do the same thing with the 38AWG wire and had to softly wind it with hand, which also takes forever.
But why did I decide to increase the winding? It was because I was not able to get the length of arc I wanted. Remember the following diagram from Slayer Exciter article? With my new beefed up circuit I still have similar to Q1 MOSFET transistor switching the primary, but my driving circuit is different. When my project finishes, I will provide the final circuit I will use to drive the high power version
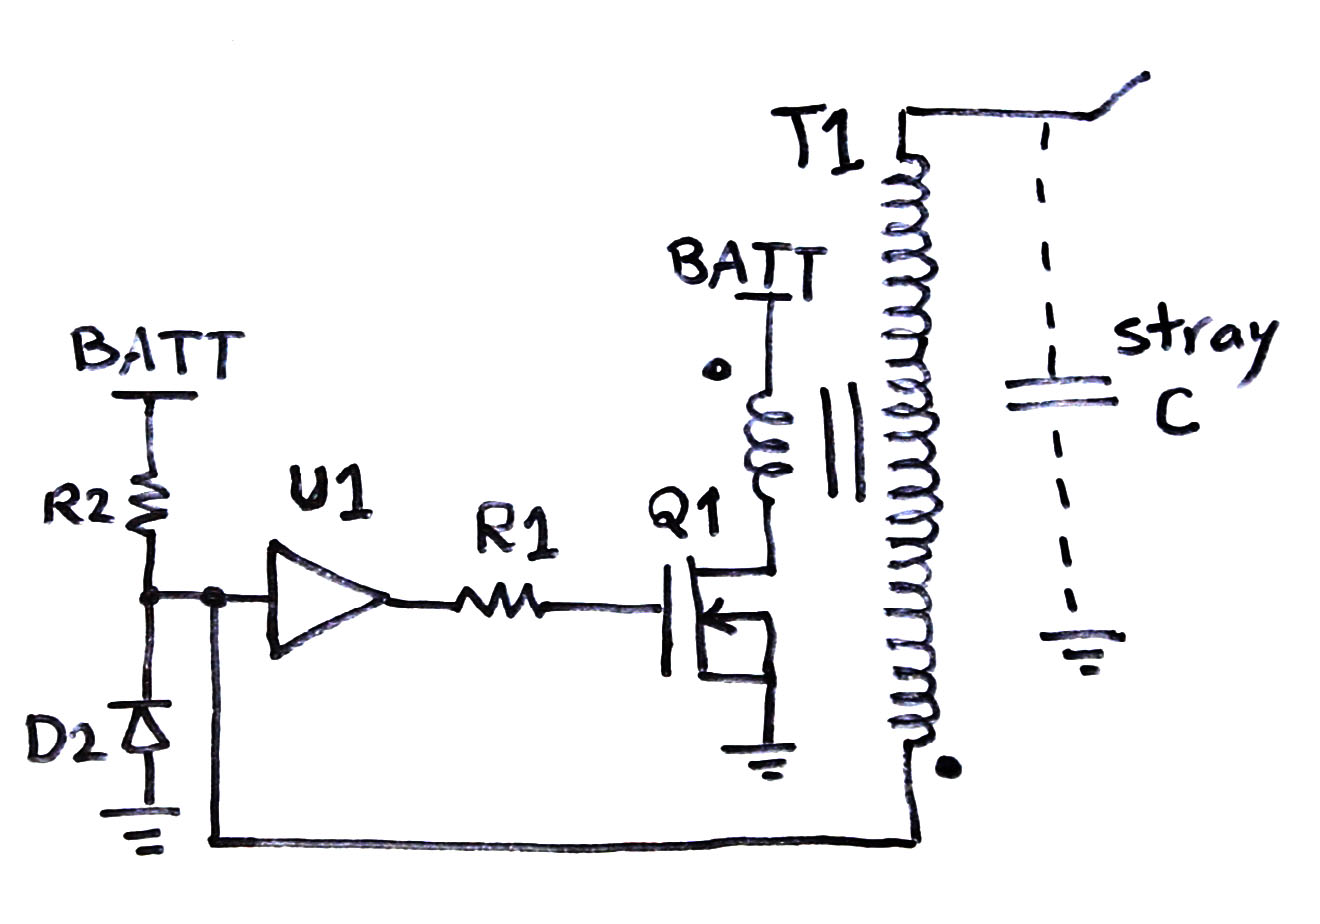
Slayer Exciter with MOSFET and gate driver
See, when we switch on the transistor, the primary is charged with high current and when Q1 turns off, the energy stored in primary causes great voltage pulses on primary that get transferred to secondary with respect to the transformer winding ratio. This is similar to my discussion in Making a Taser article.
Now this great voltage spike on the primary falls over the transistor. So it needs to be able to handle such high spikes. Otherwise it will enter an operating range called avalanche mode, where the transistor will start conducting high currents and at such high voltage, it would mean great power across the transistor which quickly heats it up and will pop like you saw in the video.
Now my transistors were rated at 1200V, which means that if everything went as planned, I could get a maximum of 1200 x 70 (transformer ratio) = 84kV. But you saw what my best arcs looked like at such high voltages. Still impressive, but I wanted more.
To satisfy my greed, I had two ways:
- I had to raise the MOSFET rated voltage. But after some searching they would end up very expensive each.
- I had to change my secondary to one with much higher turns so that the secondary to primary ratio would be higher. I’m planning on over 200:1 ratio.
So the second plan was much cheaper to achieve and I’m doing that. We will see how well it goes later. I am also hoping for some additional benefits which are:
- Increased inductance should lower the coil’s resonance frequency and hopefully a better control of the output.
- Should be able to use the 170VDC more safely as the higher inductance should mean lower current.
- And of course triple the output voltage and triple the arc length
Of course there is a third way which is shown in the image below. This was original Tesla’s way. He was actually inducing tens of thousands of volts over his primary which would mean over millions of volts on secondary. The way he did is, he was using a first transformer to raise an AC voltage to many thousands of volts, which he would charge across a capacitor. The capacitor was connected to the primary through a spark gap. When the capacitor voltage would rise high enough, which would happen in every cycle of the AC, the air in the spark gap would break and an arc would short the contacts between the spark gap, throwing all that high voltage across the primary which would oscillate at high frequency until the energy was depleted.
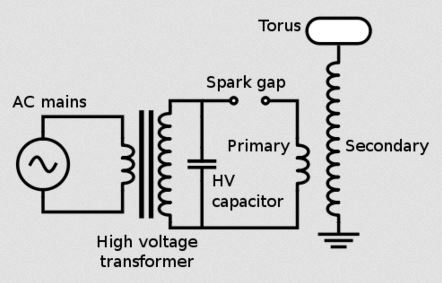
This is one of the ways Tesla did it
Now, that capacitor had to be in tune with the coil’s resonance frequency. The sparks would fly out of the toroid on the top.
This method creates great arcing noise as the spark gap breaks with a frequency equal to the AC. and also the arcs are much more lethal, as they pulse out at AC low frequency.
But I like the solid state method better, as you can make it virtually noiseless if the feeding power supply doesn’t have low frequency noise or ripple. And also you can touch the arcs with a piece of metal and they won’t zap you (skin effect)
I will discuss all these and my driver design later when I’m done making it. But for now, stay tuned!